How To Add Color To Planning Center Services?
In this Quick Tip, Joshua will show you how to add color to your Planning Center Services Plans page.
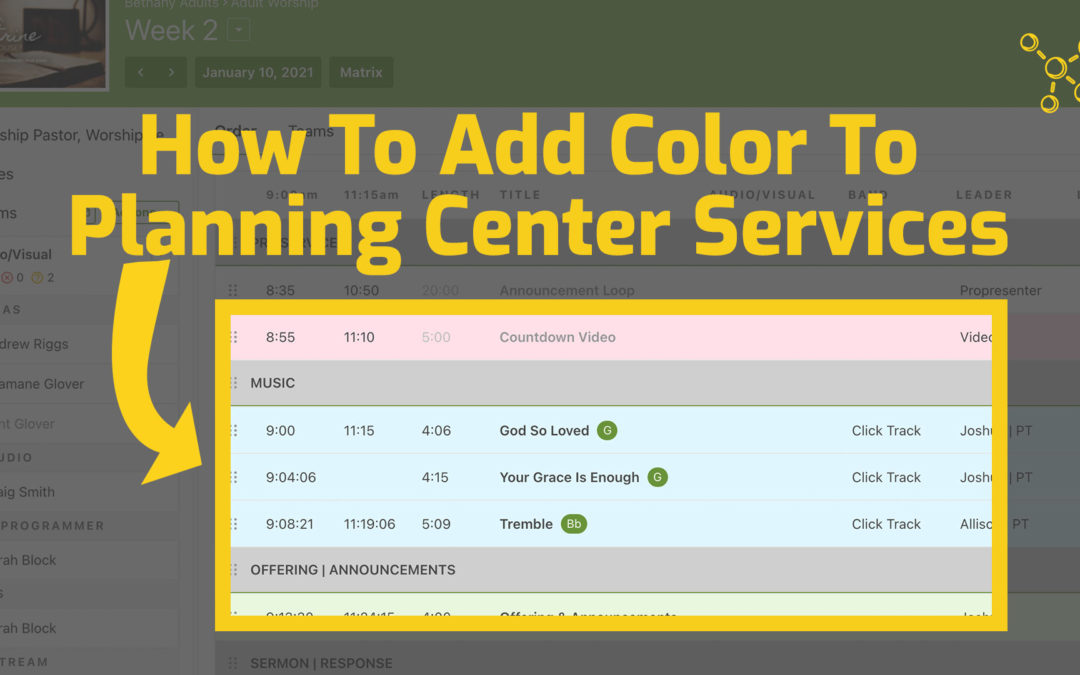
Adding color will help your service elements stand out and help your team clearly see what elements are the grouped together.
Note: At this time you can’t print the rows in color. You can only see the color from your computer or device.
Transcript
Hey everybody how’s it going? I’m Joshua. I’m the creator of WorshipResources.church. We help you discover and learn how to use quality resources to make your church better. If I can help you in any way, I’d love to connect with you in the comments. Today we’re gonna talk about Planning Center Services and how you can customize the look using color to help things stand out. Okay, I’m gonna show you how it’s done.
Now, first of all, I’m gonna go to plans and we’re gonna change to the new plans page, so I’m gonna click try it now.
Now, if you are an admin or an editor, you’ll be able to see this currently, but eventually everyone will be on the new plans page, I’m gonna click try it now, and here I am in the new plans page.
So I’m gonna go back to plans and click the gear at the top right, and then click Settings. Okay, so I’m editing the settings for adult worship.
I’m gonna scroll down, see where it says item row colors, they already have three set up for headers, songs, and media. So I’m gonna go ahead and change the color of these.
I’m gonna click grey, save, I want the songs to be blue. I’m gonna save. And media, we will leave them as white ’cause we actually don’t use media files very often.
Now, I did notice that if you click on a color and you don’t click save, that it won’t save for you. So make sure you click Save. Okay, so now I’m gonna go back to the plan, and I’m gonna go to this first plan here, and we’ll see if we have some color and – there’s no color.
The reason is, every user has to say that they want to see the color. So even if you set this up as an admin, your team is not gonna see it unless they do this step. On the top right, click the drop down and then check the box, use custom item row colors, and you can see as I check it, then the colors show up.
Okay, so now I have my blue and all the songs stand out really nicely.
But what if I wanna add a custom color for these… Well, go back to plans, click on the gear, go to Settings, and then right here where it says add, click Add, and then you can put in a title… I’m gonna put in a title of something that we always use, for instance, announcements.
And I want announcements to be green, so I wanna click Save and I’m gonna go back to the plan and just see if it’s working and… Yes!
Now you’ll notice that offering and announcements turned green, and that’s because I define the word announcement to be green, so any time announcements is used in a description, that’s gonna show up green, I’ll show you specifically with sermon, bumper and sermon – ’cause I want a sermon bumper, I want all of our video files to be red.
Okay, so I’m gonna go back up to plans, select the gear, go to Settings, scroll down, I’m gonna click Add, and we’re gonna say sermon, and that’s gonna be green, ’cause I want all of our speaking items to be green, so announcements, offering, sermon, etcetera.
And then I’m gonna add another one for sermon bumper. I want that to be red. And I’m gonna add one more for countdown video. I want that also to be red.
Okay, so I’m gonna go back to plans and let’s see what we have. So we’ve got countdown video in red, that’s good. Offering is green. Sermon bumper, that should be red. And then sermon is green.
The reason sermon bumper is not red is because I defined the sermon as green, and Planning Center is gonna recognize the first word of the description.
So I’m gonna go back to plans one more time. Click settings. I’m going to edit sermon bumper and just call it bumper. Save.
Now when I go back to plans and select the plan, the sermon bumper video is red, so now all my videos are red. All my songs are blue, my headers of course are dark gray and all speaking – offering, announcements and sermon are green.
Okay, so that’s how you do it. That’s how you can have custom colors. Again, you have to be an admin or an editor currently, but I’m sure later on in 2021, they will open this up for everybody.
And also if you want your teams to see the colors they have to click the little three lines.
Drop down and check the box. Use custom item row colors.
Hey I hope this was helpful for you. If you have any questions about Planning Center I’d love to connect with you on our Planning Center Facebook group just follow the link right here and join us on our Facebook group.
Hey if I can serve you in any way send me an email joshua@worshipresources.church.
And I hope you like the video. If you did go ahead and click Like. Subscribe if you haven’t, and maybe share this with a friend.
Can we print it out in color that way? Thanks for your insights
Unfortunately, as of now you can’t print the custom colors. You could screen shot your order and then print that but that is not ideal. Hopefully, Planing Center will add the option to print custom colors soon.